 Create
or update products
Create
or update productsBatch (or bulk) product handling processes can significantly reduce product setup time. These batch processes enable you to:
● Add or update products of the following types:
● Ad Hoc
● Digital Download
● Non-Printed Products
● Static Document
● SmartCanvas
● FF-Inventory
FF-Inventory is only available for
MarketDirect StoreFront
users with a MarketDirect Fulfillment license.
●
For information on obtaining
a license for MDFF, please contact your sales representative, call (412)-690-3050,
or complete the Web form at https://epssw.com/contact-us.php.
Fulfillment and NPP products created and pushed to MarketDirect StoreFront from an integrated MIS can be updated using product import.
● Add or update product pricing
 Create
or update products
Create
or update products1 Go to Administration > Export / Import.
2 Open the Import tab.
STEP 1: Download the template for the product data you are importing:
1 In the Import section, select Products-Add or Update from the drop-down list.
2 Click Download Template and save the file.
3 Open the downloaded template file and clear the dummy information.
STEP 2: Upload the product data you are importing:
1 Enter your data into the template.
The required fields for all product types are
Name, Display Name, and Type.
The data you enter must
match the data for these fields in the system.
The following is a list of required fields for specific product types:
-Ad Hoc—Ticket Template
-Static Document—Ticket Template
and Content File
-Digital Download—Content
File
-SmartCanvas—Ticket
Template and SmartCanvas Template Name
MarketDirect StoreFront recommends
administrators complete as many fields as possible.
If you are updating an existing product, you only need to include the required fields for that product type and the fields you want to update in the system.
The first row of the table is reserved for
column headings, so begin your data on row two of the table.
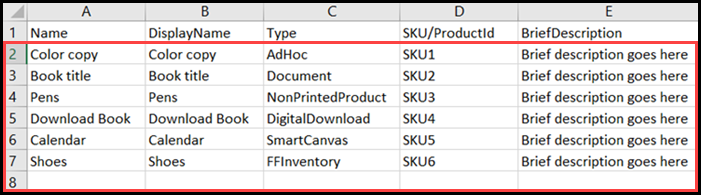
Name: Enter any name for the product. (Limit: 50 characters)
DisplayName: Enter any display name for the product. (Limit: 2,000 characters)
Type: Enter one of the six supported import product types: AdHoc, Document, NonPrintedProduct, DigitalDownload, SmartCanvas, and FFInventory
Use "Document" for Static Document products.
SKU/ProductId: Enter any ID for the product. (Limit: 50 characters)
BriefDescription: Enter any brief description for the product. (Limit: 2,000 characters)
You can format the text here using standard HTML format tags (e.g., <B> ... </B> or <U> ... </U> ).
Icon: Enter the name of the image file(s) to use for the product icon.
Supported image file types: bmp, gif,
jpeg, jpg, pjpeg, png.
Multiple Icon file
names must be separated by a comma.
To have MarketDirect StoreFront create an automatic thumbnail image for the product icon, enter AutoThumbnail in the Icon column. The auto-thumbnail option is only available for the Static Document product type.
LongDescription: Enter any long description for the product. (Limit: 4,000 characters)
You can format the text here using standard HTML format tags (e.g., <B> ... </B> or <U> ... </U> ).
DetailImage: Enter the name of the image file(s) to use for the detailed image of the product.
Supported image file types: bmp, gif,
jpeg, jpg, pjpeg, png.
Multiple Detail Image file names must be separated by a comma.
To have MarketDirect StoreFront create an automatic thumbnail image for the product icon, enter AutoThumbnail in the DetailImage column. The auto-thumbnail option is only available for static products, which is the Document product type.
Active: Enter TRUE or FALSE to indicate whether or not the product will be active or inactive.
TurnAroundTime: Enter a turnaround time for the product using any numeric value between 0 and 9999.
TurnAroundTimeUnit: Enter one of the four supported turnaround time units: Hour, Day, Week, Month
QuantityType: Enter one of the four supported quantity types: Any, Multiple, Fixed, NA
MaxOrderQuantityPermitted: Enter a maximum order quantity using any numeric value between 0 and 100000.
Quantities: Enter any quantity/quantities for the product separated by a hyphen.
For example, if you want to allow buyers to order quantities of 10, 20, or 50, type 10-20-50 in the Quantities column. Leave the field blank if you want to allow buyers to order any quantity.
AllowBuyerToEditMultipleQuantity: Enter TRUE or FALSE to indicate whether or not buyers will be able to edit multiple quantity values for the product.
EnforceMaxQuantityPermittedInCart: Enter TRUE or FALSE to indicate whether or not you want the shopping cart to enforce the maximum quantity (i.e., permit passing orders with quantities that exceed the specified maximum).
OrderQuantitiesAllowSplitAcrossMultipleRecipients: Enter TRUE or FALSE to indicate whether or not you allow order quantities to be split across multiple recipients.
DescriptionFooter: Enter any additional information about the product. The footer will be shown on the storefront and in the product details.
ProductNotes: Enter any notes for the product. (Limit: 4,000 characters)
KeyWords: Enter any descriptive keywords that will help buyers searching for the product.
Separate keywords with a comma ( , ), spaces are not necessary, and note that you total character count for keywords cannot exceed 500.
SEOTitle: Enter the product page title.
UrlSlug: Enter the part of the URL that describes the web page's content.
MetaDescription: Enter a short description of the product.
MarketDirect StoreFront recommends you update this field in order to maximize the SEO for the product page. It is a best practice to keep the Meta Description to 50 words or less.
MobileSupported: Enter TRUE or FALSE to indicate whether or not you want the product to be shown / available to buyers accessing the storefront on a mobile device.
BuyerDeliverableType: Enter one of the 3 supported deliverable types: Print, PrintAndDownload, Download
WeightValue: Enter the product's weight using any numeric value.
WeightUnit: Enter one of the four supported weight units: oz, lb, g, kg
WidthValue: Enter the product's width using any numeric value.
LengthValue: Enter the product's length using any numeric value.
HeightValue: Enter the product's height using any numeric value.
Dimension: Enter one of the four supported dimension units: Inches, Feet, Centimeters, Meters, mm (Millimeters), Yard
MaxQuantityPerSubcontainer: Enter the maximum quantity per subcontainer.
ShipItemSeparately: Enter TRUE or FALSE to indicate whether or not you want to ship the products separately from other products.
ContentFile: Enter the name of the content file(s) for the product (e.g., for digital download and static, or "Document," product types).
Leave this column empty for products
with no content file.
Multiple Content File names must be separated by a comma.
TicketTemplate: Enter the ticket template associated with the product.
The ticket template name must match an existing ticket template in MarketDirect StoreFront.
ProductNameToCopySecuritySettings: If you want to apply an existing product's security settings to the imported product, Enter the name of the existing product (must match the Name not the Display Name).
This will cause MarketDirect StoreFront to apply the security settings (purchase, manage permissions) for an existing product to the product you are importing.
MISItemTemplate: Enter the MIS SKU for the product.
SmartCanvasTemplateName: Enter the SmartCanvas template name.
DynamicPreview: Enter TRUE or FALSE to indicate whether or not you want to enable dynamic preview of the product.
AllowBuyerConfiguration: Enter TRUE or FALSE to indicate whether or not you want to allow buyer configuration for the product.
StartDate: Enter the start date for the product to be active on the storefront.
If you do not specify a Start Date, then the product will be active on the storefront by default.
EndDate: Enter the end date for the product to be active on the storefront.
If you do not specify a End Date, then the product will stay active on the storefront.
StoreFront/Categories: Enter the storefront(s) and categories to which the product is assigned.
You can assign the product to multiple storefronts and/or categories.
Multiple storefronts or categories must be separated by a comma. The order of the storefronts or categories does not matter.
BuyNowButtonDescription: Enter the button text for the Buy Now button on the storefront.
UseSmartCanvasLegacy: Enter TRUE or FALSE to indicate whether or not to enable SmartCanvas Legacy for the SmartCanvas template.
SmartCanvas products with UseSmartCanvasLegacy set to False will use the new version of SmartCanvas on the storefront.
Commodity Code: Enter the tax code to specify the type of item for more accurate tax calculations.
You can obtain tax codes from the official site of your external tax service provider.
The following fields are only applicable to FF-Inventory products:
PickLocation: Enter the pick location of the product.
WareHouseName: Enter the name of the warehouse where the product is stored.
Warehouse Name is only necessary if you have the same pick location in multiple warehouses.
IsHighValueProduct: Enter TRUE or FALSE to indicate whether or not the product has a high value.
HasUniqueSkid: Enter TRUE or FALSE to indicate whether or not the product has a unique skid.
PickStrategy: Enter how the product is to be picked after it is ordered. There are three supported pick strategies:
FIFO Skid Id
LIFO Skid Id
Default Location, FIFO Skid Id
NotifyOnInventoryReceive: Enter TRUE or FALSE to indicate whether or not you want to send an email notification to specified recipients when you receive inventory for the product.
CustomerRep: Enter the customer representative at the company who is supplying the product.
SalesRep: Enter the sales representative at your company who is responsible for servicing the customer who is supplying this product.
PhysicalCountInterval: Enter one of the five supported physical count intervals: None, Weekly, Monthly, Quarterly, Yearly
StorageType: Enter the special storage needs for the product.
AllowBackOrder: Enter TRUE or FALSE to indicate whether or not you want to allow back orders.
BackOrderRule: Enter what happens when a buyer's order quantity for a particular product exceeds the available stock on hand. There are five back order rules: None, Cancel entire order, Cancel back order - ship partial, Back order - ship partial, Backorder Entire Order
ShowInventoryWhenBackOrderAllowed: Enter TRUE or FALSE to indicate whether or not you want buyers to see inventory levels if you allow back orders.
Threshold: Enter the quantity threshold that will trigger the system to send an email notification that inventory for the product is getting low.
If you set the threshold to 100, when the Stock on Hand drops to 100, the system will send email notifications to specified recipients.
Emails: Enter the emails that will receive notification when the product's inventory reaches the Threshold or a quantity of the product is received.
EnableProductReturn: Enter TRUE or FALSE to indicate whether or not you want to enable returns for the product.
Barcode: Enter the alpha-numeric value of the product's barcode.
AutoReplenishmentToDefaultLocation: Enter TRUE or FALSE to indicate whether or not to enable auto-replenish of inventory to the Default Pick Location.
AutoReplenishmentToDefaultLocationMinQty: Enter the minimum quantity of inventory allowed in the Default Pick Location before an inventory transfer request is triggered.
AutoReplenishmentToDefaultLocationMaxQty: Enter the maximum quantity of inventory allowed to be replenished automatically. Inventory will be moved from other locations to the Default Pick Location based on the Inventory Pick Strategy.
For more information about Auto Replenishment to Default Location, see Inventory Transactions.
2 Save the file with a new descriptive name.
3 Place all the assets associated with the products you are creating (e.g., the icon, product images, and content files) in a folder along with the template CSV file with all the product details.
4 Create a zip file of the folder (i.e., that contains all the items in the folder).
The import file must be a zip file of a folder even if you are only importing a single CSV file.
5 Click Choose File on the Import tab.
6 Select the zip file you created and click Open.
7 Leave the default Unicode (UTF-8) format in the Type field and comma ( , ) as the Field Delimiter (e.g., , for CSV files).
8 Click Import Template.
9 Verify the outcome of the import. The Records Updated, Records Imported, and Unprocessed Records fields display the number of records in each state. If there is an error processing the records, an Error File link will display.
Each record that cannot be added or updated to the system database will be output to an error file marked with a reserved delimiter such as ]]]]]]]]]]ERROR. Click the Error Link to open the file, which will indicate why the record was not processed. You can make necessary changes to the error file then reprocess it. You do not have to delete the ]]]]]]]]]]ERROR for each record.
Add or update product
pricesTo add product prices by batch import:
1 Go to Administration > Export / Import.
2 Open the Import tab.
STEP 1: Download the template for importing product pricing:
1 In the Import section, select Products-Pricing from the drop-down list.
2 Click Download Template and save the file.
3 Open the downloaded template file and clear the dummy information.
STEP 2: Upload the pricing data you are importing:
1 Enter your data into the template.
Warning: All of the fields, except for DigitalDownloadPrice, in the Products-Pricing spreadsheet are required. RangeStart and RangeEnd can be left blank if there is no range start or range end.
The first row of the table is reserved
for column headings, so begin your data on row two of the table.

● PriceItemType: Enter Catalog, which is the only supported type at this time.
● PriceItemName: Enter any alpha-numeric value for the price name.
The specified value must contain the exact Name (not Display Name) of an existing product in MarketDirect StoreFront.
● PriceSheetName: Enter any alpha-numeric value for the price sheet name.
The specified value must contain the exact Name (not Display Name) of an existing price sheet in MarketDirect StoreFront.
● RangeStart: Enter any numeric value for the start of the range.
Note
on Setting Up Volume Pricing: The Range Start and Range End
columns can be used to set up volume price breaks.
Volume price breaks: For example,
in the example above, rows 3 - 5 all refer to the same product "Diary."
Quantities of 1-10 units are priced at $25 (or specified currency);
11-20 units are priced at $20; 21 or more units are priced at $25.
Flat pricing (non-quantity-based):
Rows 2 and 6 in the example show how to set up flat pricing and specify
that each unit (1 or more) of the product is priced the same with
no volume breakpoints.
You can leave this column empty if there is no range start.
● RangeEnd: Enter any numeric value for the end of the range.
You can leave this column empty if there is no range end.
● RegularPrice: Specify any numeric value between 0 and 9999999999 for the regular price.
● SetupPrice: Specify any numeric value between 0 and 9999999999 for the setup price.
● DigitalDownloadPrice: Specify any numeric value between 0 and 9999999999 for the Digital Download price.
2 Save the file with a new descriptive name in CSV format.
3 Click Choose File on the Import tab.
4 Select the template file you have created and click Open.
5 Leave the default Unicode (UTF-8) format in the Type field and comma ( , ) as the Field Delimiter (e.g., , for CSV files).
6 Click Import Template.
If your CSV file is not importing properly, then open and save the updated CSV file using Notepad before importing.
7 Verify the outcome of the import. The Records Updated, Records Imported, and Unprocessed Records fields display the number of records in each state. If there is an error processing the records, an Error File link will display.
Each record that cannot be added or updated to the system database will be output to an error file marked with a reserved delimiter such as ]]]]]]]]]]ERROR. Click the Error Link to open the file, which will indicate why the record was not processed. You can make necessary changes to the error file then reprocess it. You do not have to delete the ]]]]]]]]]]ERROR for each record.